How to fix high-to-low bake artifacts with cages in Fyr Baker
Flat patches, missing detail and parts bleeding into each other usually come from the cage. Here is how to find and fix them in Fyr Baker before you bake.
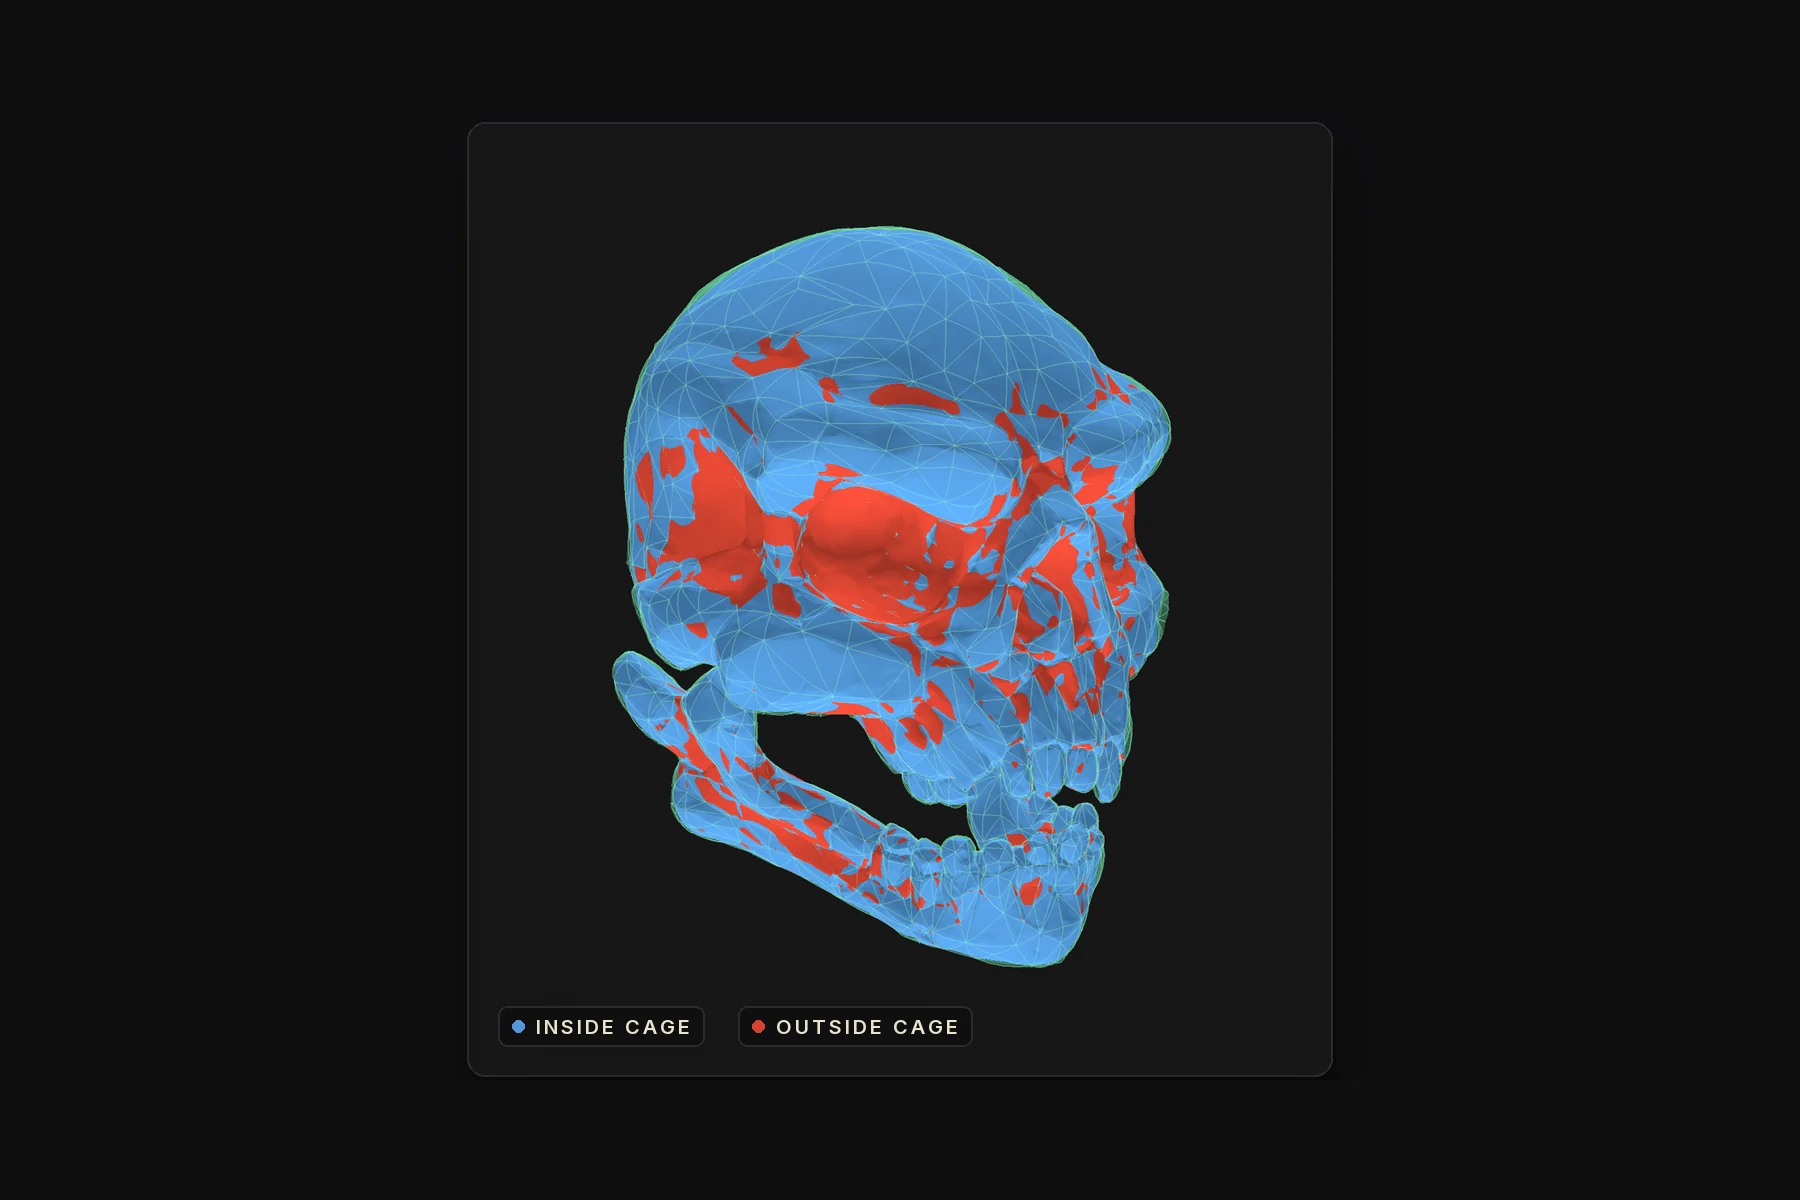
In a high-to-low bake, the cage is the starting surface the rays are cast from to find the high-poly. If the cage does not enclose the high-poly, those areas bake flat or pick up the wrong surface. Fyr Baker shows cage coverage in the viewport, so you can fix problems before you bake instead of after.
Before you start
- Line up the meshes. The low-poly and high-poly must sit in the same world-space position.
- Apply transforms (Ctrl+A) when scale or rotation differs between them.
- UV unwrap the low-poly with no overlapping islands.
- Name parts predictably, for example wheel_low and wheel_high, so they can be matched automatically.
1. Set up the bake
- In the 3D Viewport, press N and open the Fyr Baker tab.
- Select Create Bake Project and set the output Folder.
- Select the low-poly and high-poly with the low-poly active and select Add Selected Meshes, or use Add as Low and Add as High for meshes without _low and _high names.
- Check the hierarchy: the low-poly should be listed under Low and the high-poly under High.
2. Check cage coverage
- Open the Cage menu. New Bake Groups use Automatic, which calculates a per-vertex cage from the low and high meshes.
- Select the coverage icon to show Cage Coverage. Covered areas use the inside color; uncovered areas use the outside color and often bake flat.
- Rotate around the model and look closely at narrow gaps, overlaps and parts that sit close together. Coverage tells you the cage reaches a high surface, not that it reaches the right one.
3. Fix uncovered areas
Distance Based: one offset for the whole group
- Switch the mode to Distance Based.
- Use the estimate button beside Group Offset to calculate a starting offset from the gap between the low and high surfaces.
- If coverage is still incomplete, raise Group Offset in small steps. Use the smallest distance that covers the high-poly: too much and the cage reaches nearby parts.
- For one mesh that needs more or less, use Object Offset and its estimate button.
Paint offset where one value does not fit
A mesh with thick and thin areas rarely works with a single offset. Select Paint Offset and paint on the low-poly: white uses the full offset, black uses none. Offset Scale multiplies the result. The coverage overlay updates as you paint.
Paint skew to straighten rays
When details smear or lean, the ray direction is the problem, not the distance. Select Paint Skew and paint where the rays should straighten out: painted areas fire rays straight off the low-poly faces. Skew Amount sets the strength. Enable Skew and adjust Needle Length to see the ray directions in the viewport, and look for needles that cross neighboring parts or flip suddenly. Painted offset and skew are Fyr renderer controls and are hidden when Cycles is the bake renderer.
Custom: edit the cage as a mesh
Switch to Custom and assign a cage mesh under Custom Cage. It must keep the low-poly's topology and vertex order. Use Inflate, Relax, Smooth and Clean for quick fixes without entering Edit Mode.
4. Stop parts bleeding into each other
- Match By Mesh Name (under the cage mode) limits each low mesh to the high mesh with the same base name, such as wheel_low and wheel_high.
- Separate Bake Groups keep parts that need different cages, or must not see each other, apart during projection.
Use the Apply Cage Settings To row to choose whether a cage change affects the active Bake Group, the selected groups, the whole Texture Set, or every group in the project.
5. Bake and check
- Select Bake Project at a low test resolution.
- Use Preview Map to show the Normal map on the low-poly and look for flat patches, smeared details and seams.
- Adjust the cage, then select Rebake Changed Maps (the icon next to Bake Project) so only the affected maps re-bake.
Troubleshooting
- Flat patches. The cage did not reach the high-poly there. Raise the offset or paint more offset in that area.
- Detail from one part on another. The cage reaches too far. Lower the offset, use Match By Mesh Name, or split the parts into separate Bake Groups.
- Smeared or leaning details. Check the skew needles and paint skew where rays run at a steep angle.
- Dents look raised in the engine. Not a cage problem: switch Normal Format between OpenGL and DirectX.
- Hard seams. Check UV splits on hard edges, the Normal Format, and the Dilation margin.