What is texture baking? A complete guide for 3D artists
What baking is, where it came from, and why it sits at the center of almost every game and real-time art pipeline, from normal maps to lightmaps.
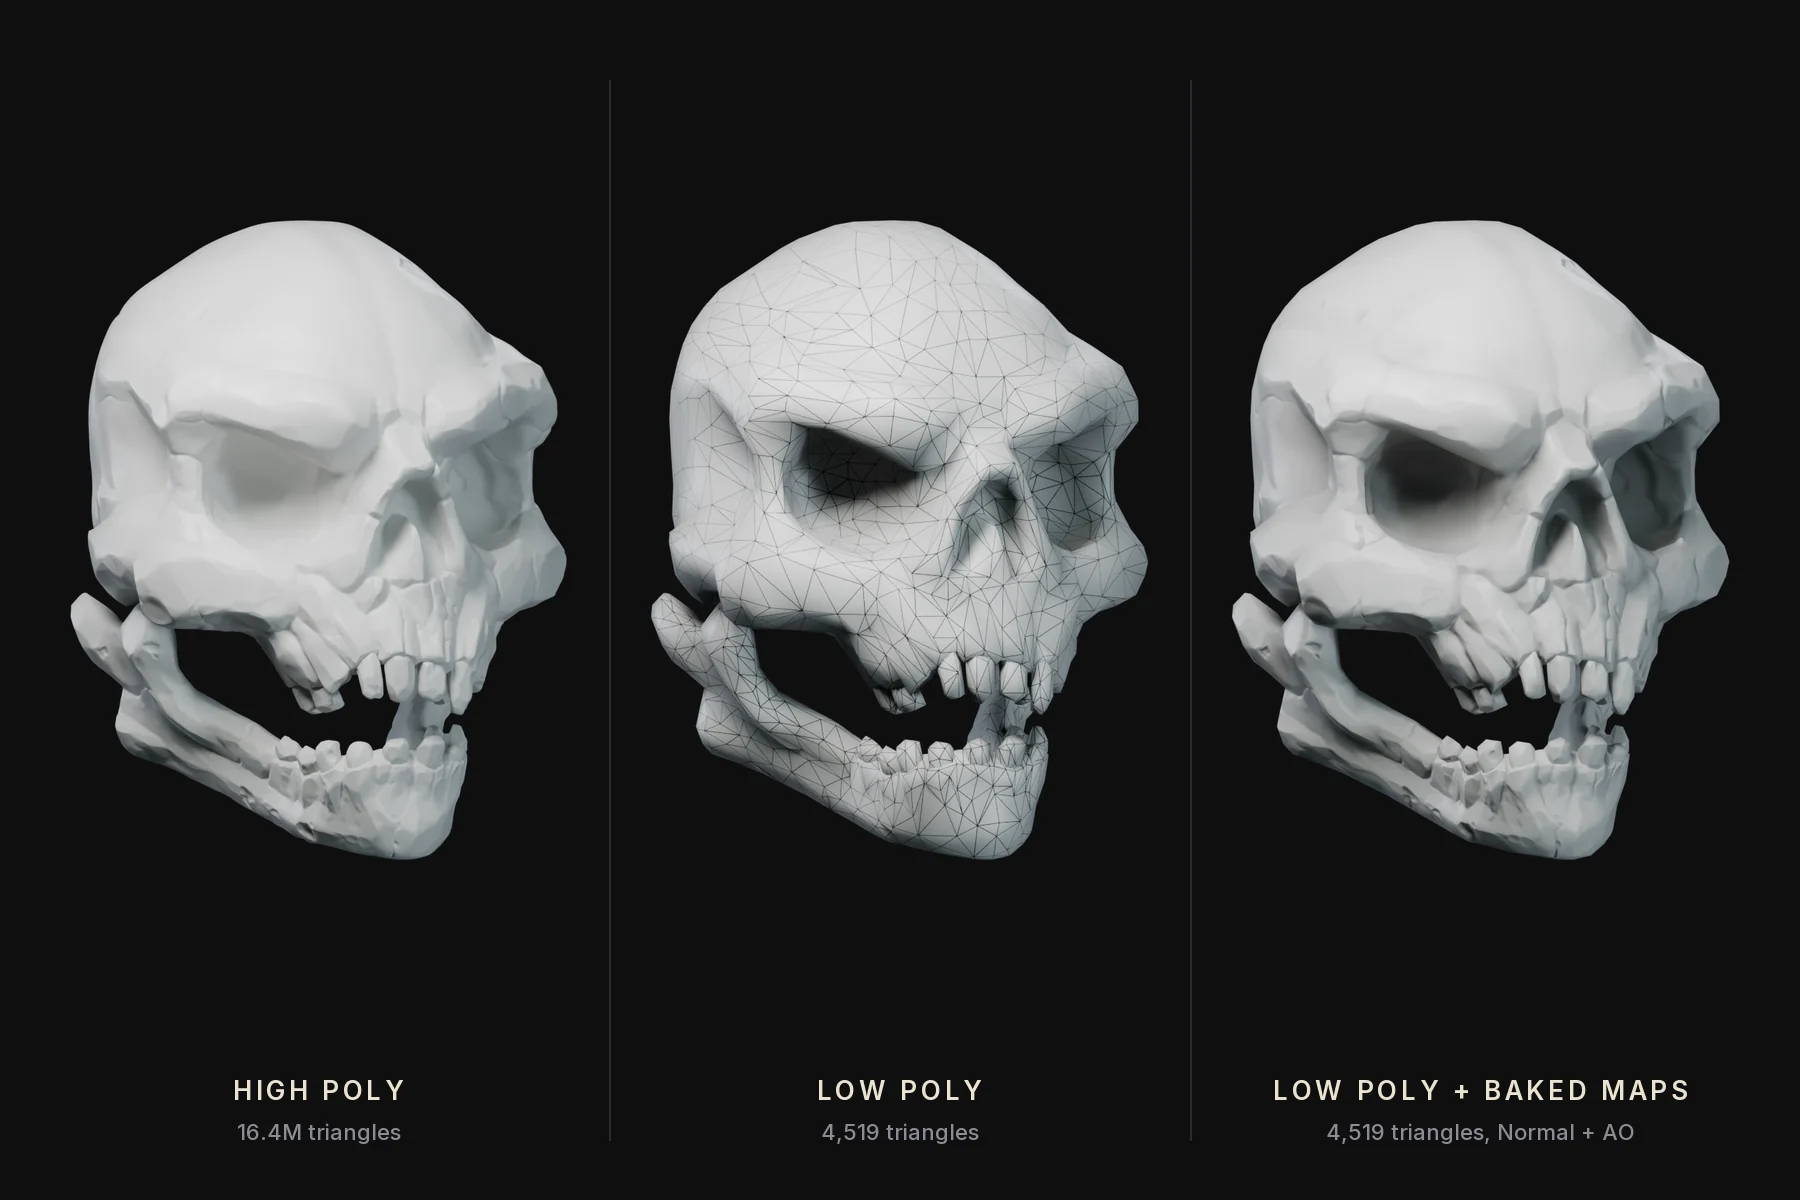
If you make 3D art for games, real-time or the web, you bake. Maybe you call it "baking a normal map", maybe it is just the button you click in Substance 3D Painter before the fun part starts. Either way, it is one of the steps that holds a modern pipeline together, and one of the steps most likely to make you stare at the screen wondering why a bolt from the wheel is now printed on the door.
I build Fyr Baker, a baking add-on for Blender, so I spend more time thinking about rays, cages and tangent space than is probably healthy. This is the guide I wish existed when I started: what baking is, where it came from, why it still matters in 2026, which maps you will run into, how projection actually works, and what usually goes wrong.
What baking actually is
Texture baking is the process of transferring details from one model to another.
Polycount wiki
That one sentence from the Polycount wiki covers the core idea. I would probably say it is the process of transferring data from one mesh to another, at least in the context of 3D models. Marmoset describes it the same way, with one useful detail: only the mesh receiving the bake needs UVs (Marmoset).
In practice, "baking" is used for three related jobs, which is part of why it confuses people:
- High-to-low mesh maps. Surface detail from a dense, sculpted or subdivided model is projected onto a lightweight model and stored as textures: normal, ambient occlusion, curvature, height and more.
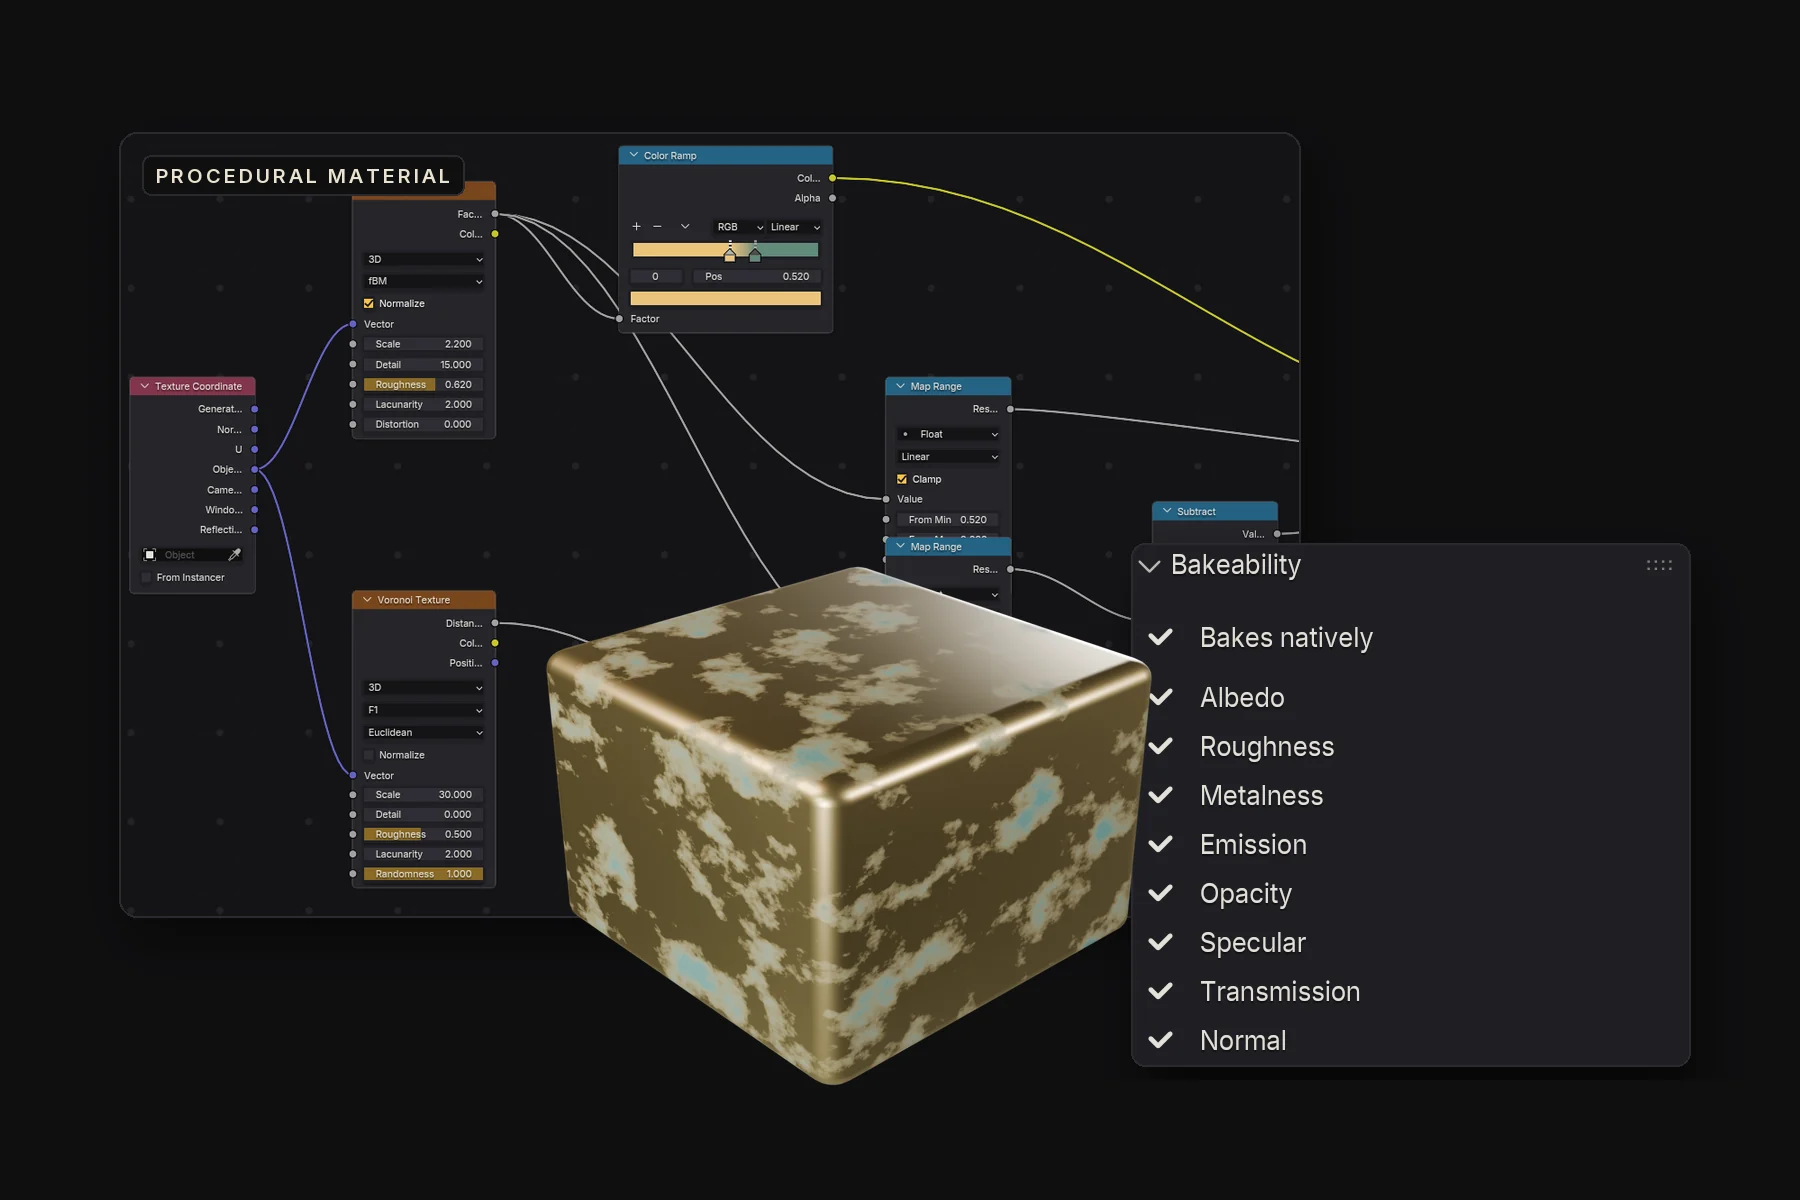
- Material and procedural baking. A material that only exists as a node graph (noise, Voronoi, gradients, layered shaders) is evaluated and written into image textures, so it survives export to an engine or another app.
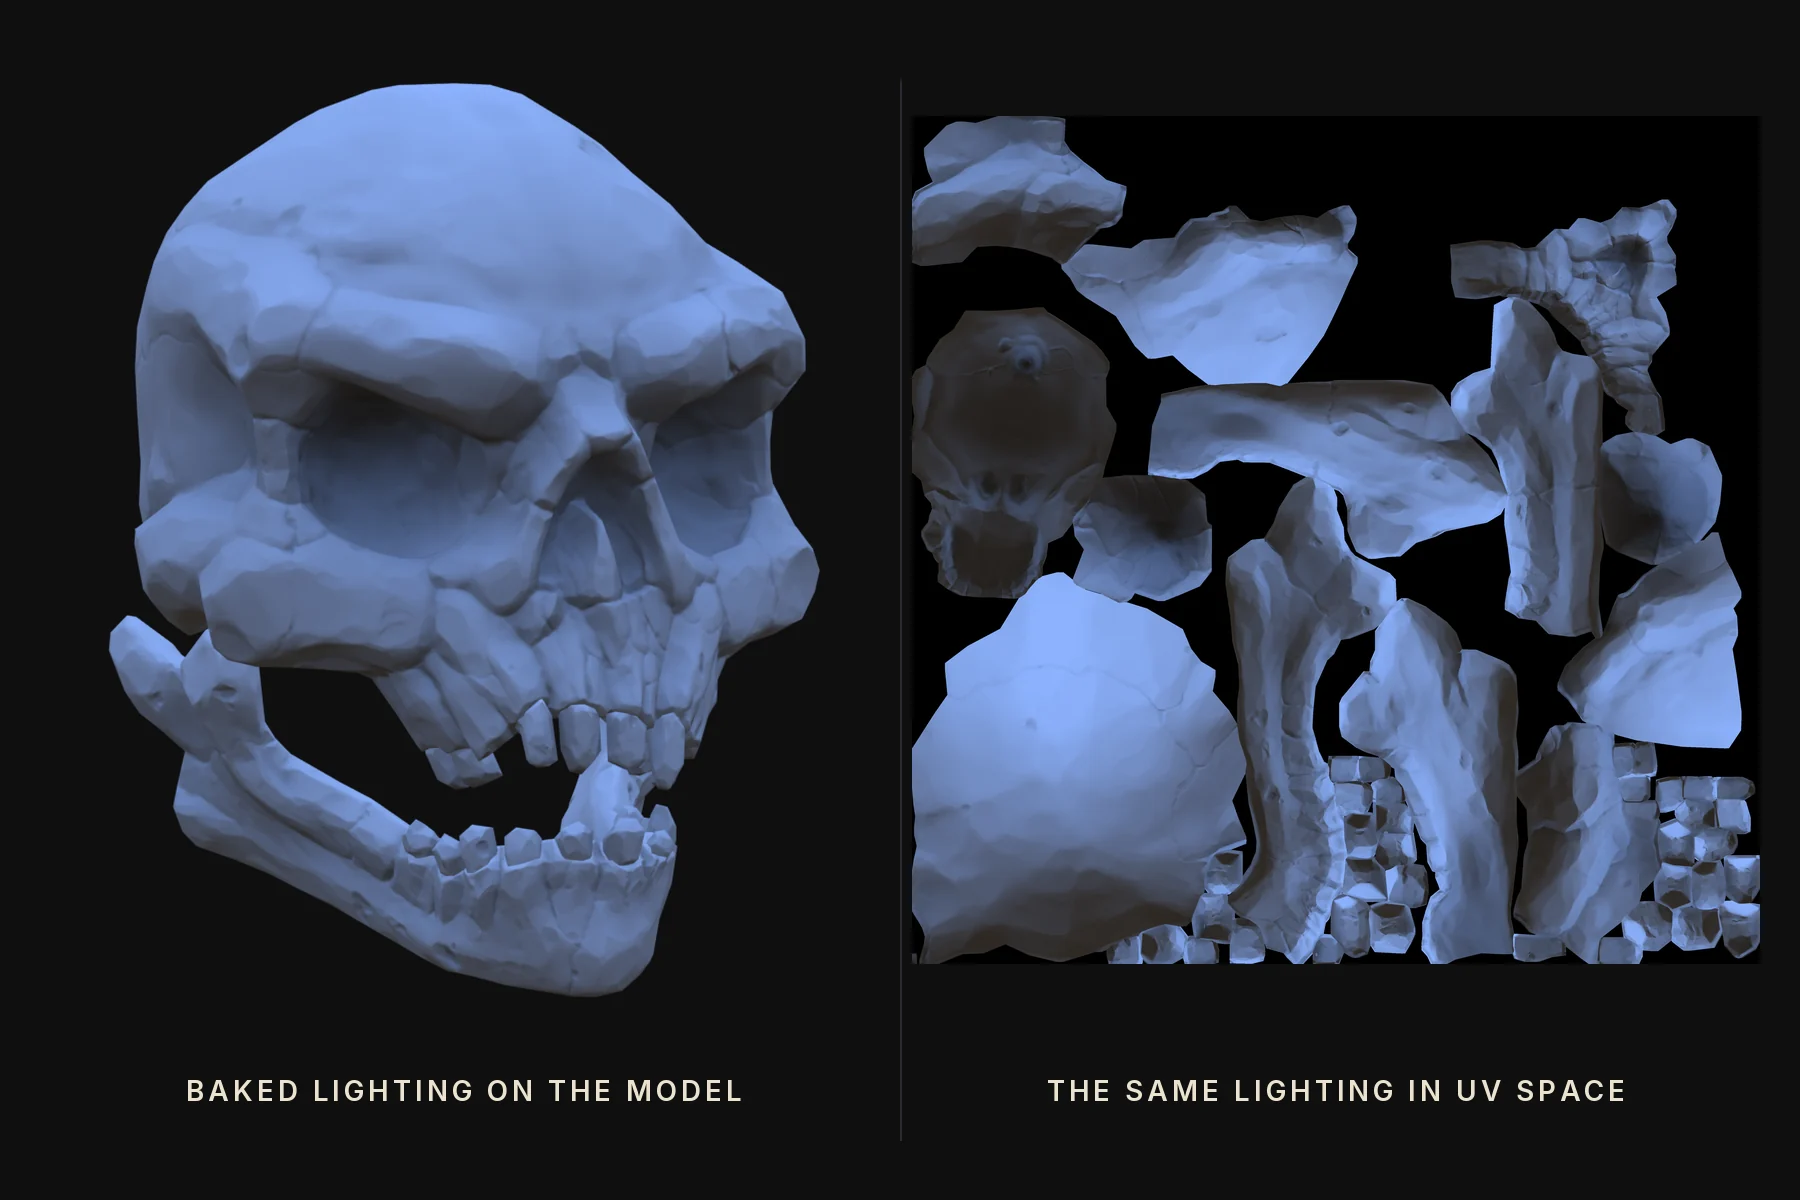
- Lighting baking. Expensive lighting such as global illumination or ambient occlusion is computed once and stored, so it does not have to be recalculated every frame.
Blender's manual lists exactly these uses for Cycles baking: maps for game engines, ambient occlusion or procedural textures as a base for painting, and light maps for global illumination or faster rendering (Blender manual). Results usually go into image textures, but Blender can also bake into color attributes (vertex colors).
A short history of baking
The research: 1978 to 1998
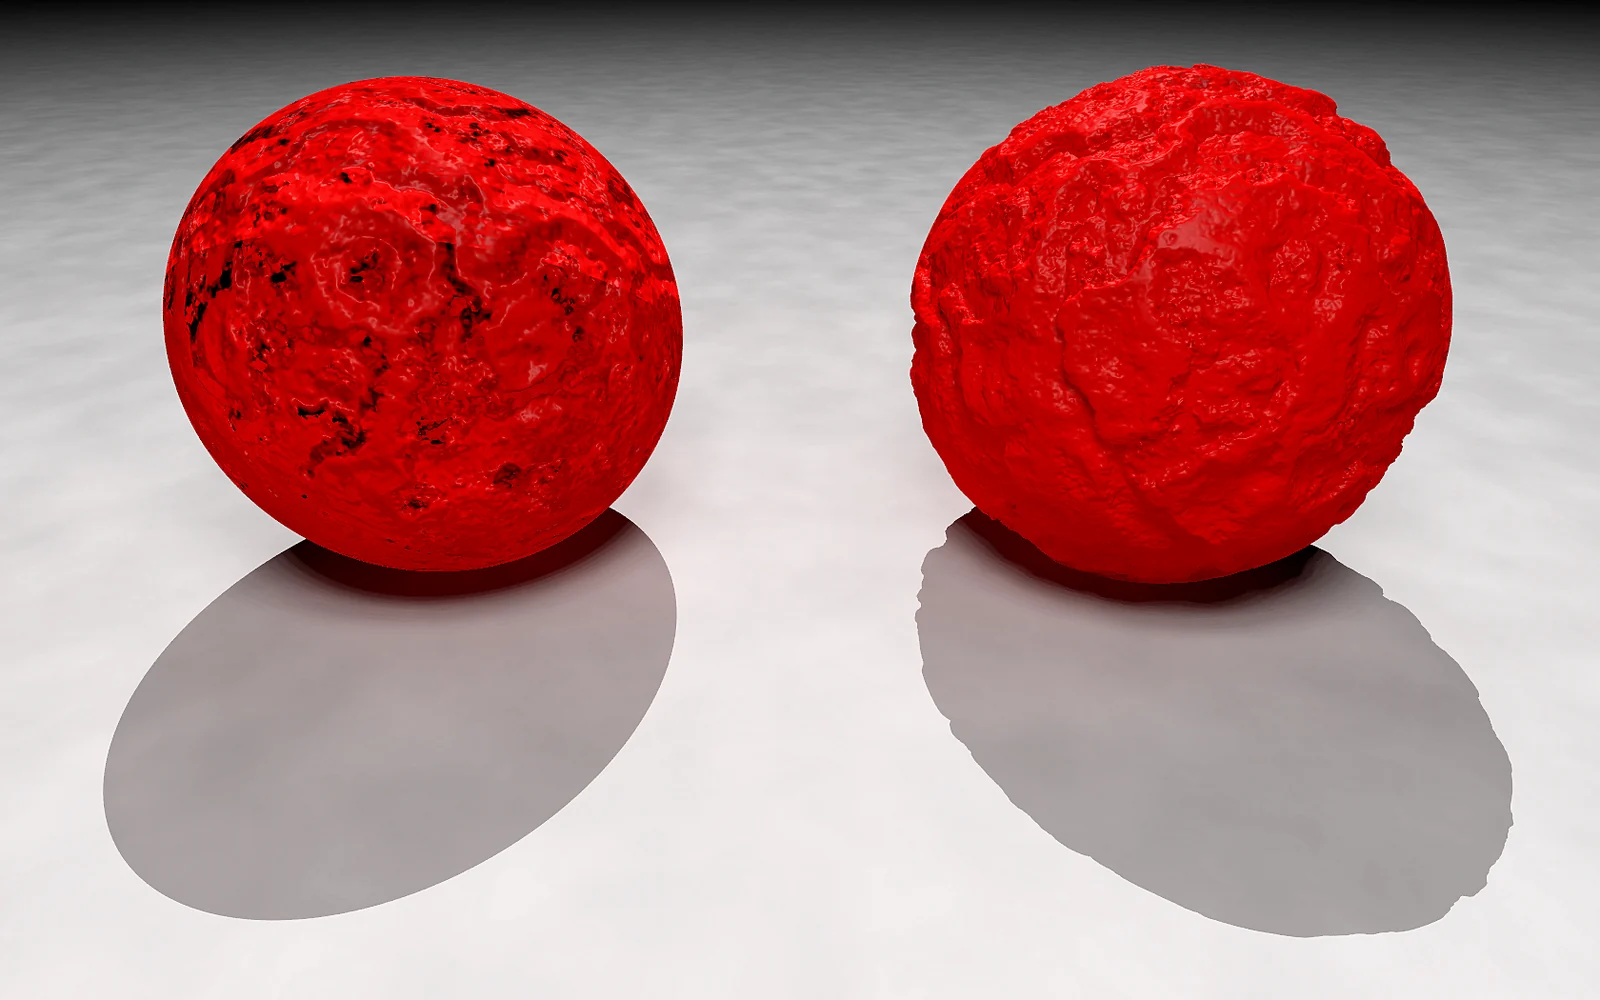
It starts with James Blinn's 1978 SIGGRAPH paper "Simulation of Wrinkled Surfaces", which nudged the surface normal before shading so a surface looked wrinkled without anyone modelling the wrinkles. Faking detail to save work turns out to be the oldest trick in computer graphics. That trick is bump mapping, and it is still the principle behind every normal map you have ever baked.
In 1996, Krishnamurthy and Levoy fitted smooth surfaces to dense scanned meshes and stored the remaining fine detail as displacement maps: detail from a heavy mesh, captured into a map. Two 1998 papers then made the modern workflow possible. Cohen, Olano and Manocha's "Appearance-Preserving Simplification" stored normals in texture maps so geometry could be simplified aggressively, and Cignoni, Montani, Rocchini and Scopigno showed how to move color and normals from a detailed mesh onto a simpler one, even one built separately. Most bakers today still combine both ideas.
Meanwhile in games: lightmaps (1996)
Games were already baking, just not normals. In Quake (1996), a light-map grid was computed for every polygon during offline preprocessing, one sample every 16 texels, and combined with the surface textures at runtime (Michael Abrash). The technique, precomputing lighting and storing it in textures, is still how most games handle static lighting.
The tools and the games: 2002 to 2004
Production tools followed within a few years. Crytek announced PolyBump in July 2002 to generate normal maps from a low-poly and a high-poly model. NVIDIA presented its Melody tool for normal map generation at GDC 2003, and ATI shipped NormalMapper, a command-line baker with exporters for 3ds Max and Maya. id Software built renderbump for Doom 3, where every surface that interacts with light has a normal map (id Software).
2004 is when players saw the result: Far Cry (March), Doom 3 (August) and Half-Life 2 (November) all shipped with normal-mapped characters and environments. Suddenly every surface had pores, rivets and dents, whether it needed them or not. Free tools such as xNormal then put high-to-low baking in every artist's hands.
Tangent space gets standardised: 2008
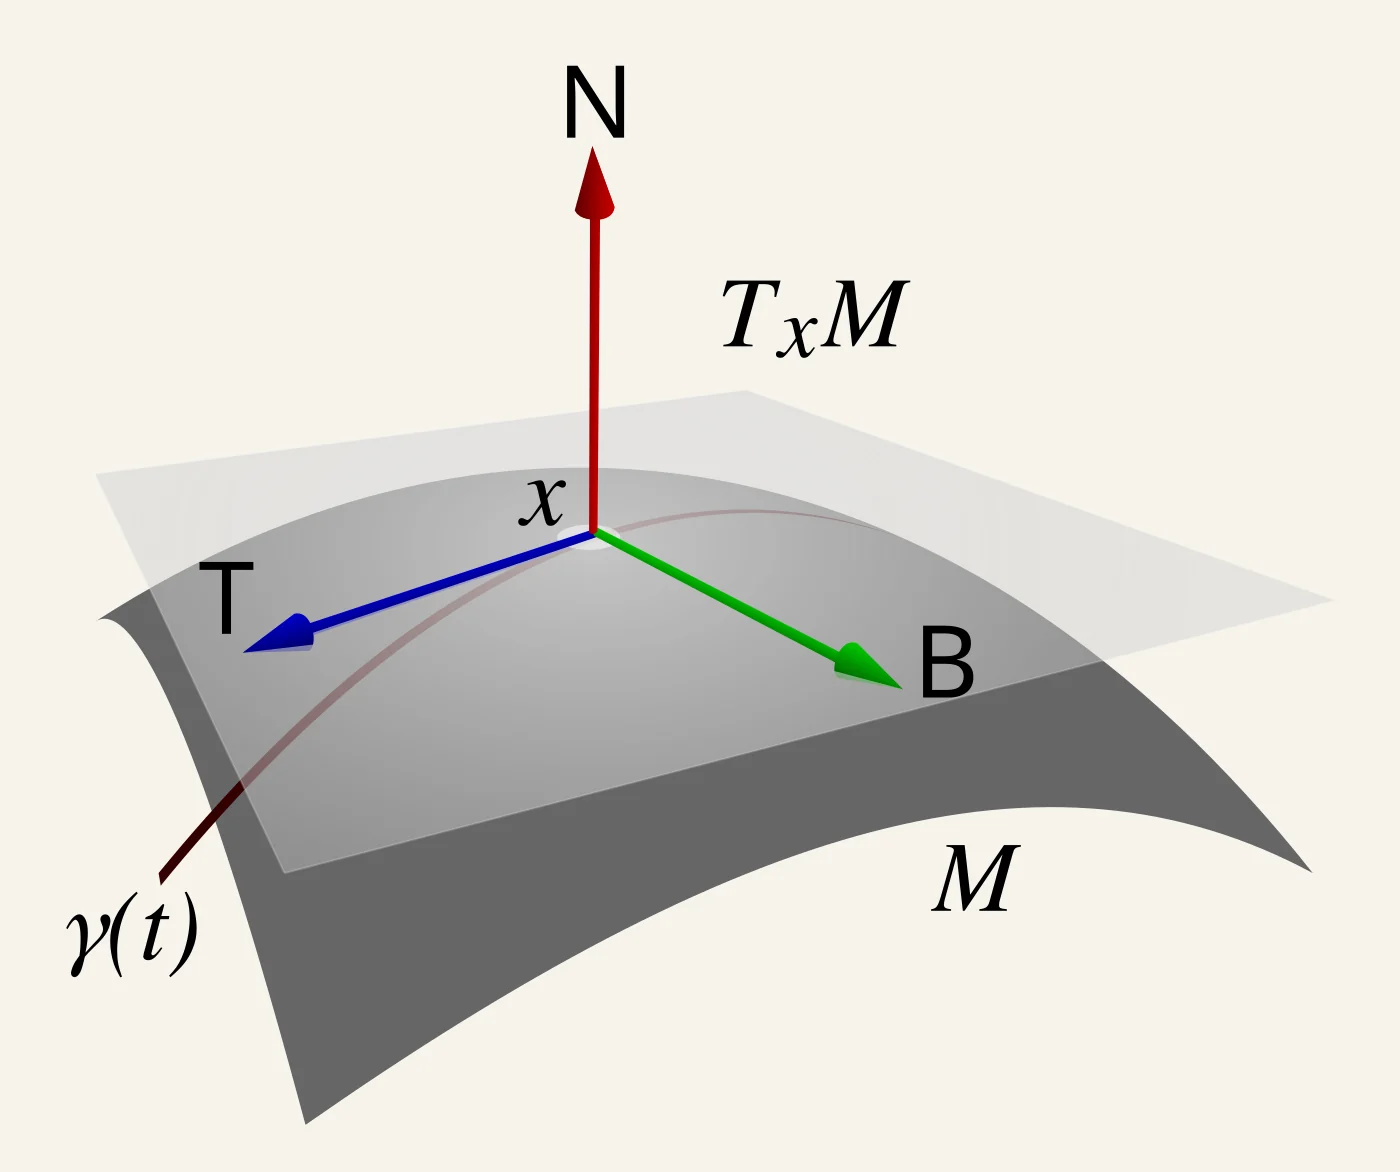
One last milestone has a Danish connection, which as a Danish developer I am more or less obliged to point out. In his 2008 master's thesis at the University of Copenhagen, Morten S. Mikkelsen analysed why normal maps on low-poly models showed lighting seams: bakers and game engines computed tangent space differently (Mikkelsen). His free reference implementation, MikkTSpace, became the shared standard. Blender, xNormal and Unity use it, and Unreal offers it on import (Unity, Unreal).
Why baking is a core part of the artist workflow
A typical game asset goes through the same stages: blockout, high-poly (sculpted or subdivided), low-poly or retopology, UV unwrap, bake, texture, export to the engine. Baking is the bridge in the middle. It carries everything the high-poly knows about its surface onto the model that actually ships. Put differently: all those hours of sculpting only reach the player because of this step.
Each stage feeds the next: the bake needs UVs on the low-poly (Blender manual), and texturing needs the bakes.
Real-time budgets
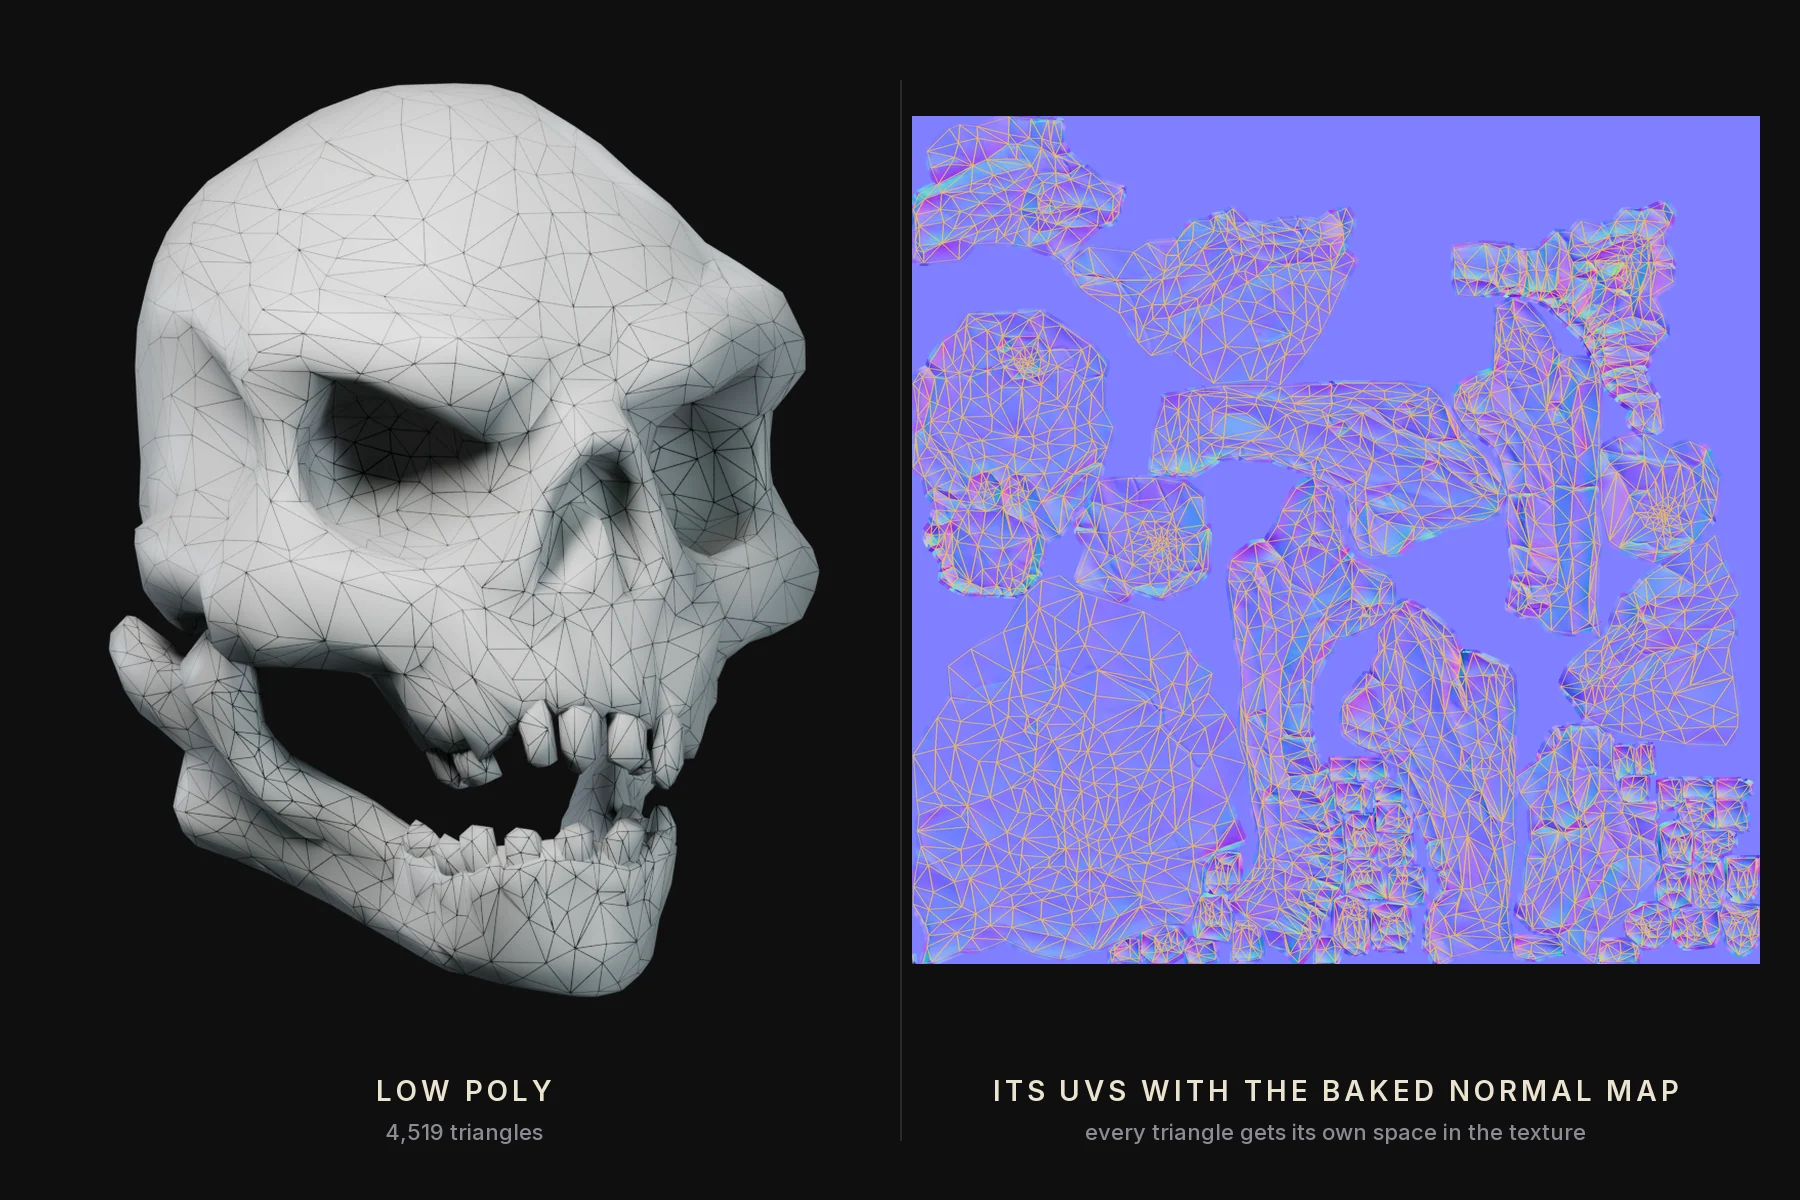
Every frame has a limited budget, and artists feel it per asset. Valve's Dota 2 workshop guidelines, for example, give an Earthshaker weapon 2,500 triangles at its highest level of detail and 1,000 at the next one down, with a 512 by 512 texture (Valve). A sculpt of that weapon can easily run to hundreds of thousands of triangles, which is impressive in exactly the wrong way. The skull in this article is a 16.4 million triangle sculpt baked onto a 4,519 triangle low-poly. A normal map lets a low-poly model shade as if it had the sculpt's surface detail, at a fraction of the cost (Unity).
Texturing runs on baked maps
Modern texturing tools are built on top of bakes. In Substance 3D Painter, generators create masks from the mesh using baked utility maps such as position, curvature and world-space normal (Adobe). That is how a smart material knows where edges wear, where dirt collects in crevices, and where rust starts at the bottom of an object. Adobe's own example: a position map tells the rust generator where the bottom of an old car is (Adobe).
Materials have to leave the app
A procedural material built in Blender's node editor does not travel. It lives in Blender, it likes it there, and it will not follow you to Unreal. Blender's glTF exporter supports a recognised metal/roughness material setup, and FBX export expects image textures on a Principled BSDF (Blender manual). Anything else has to be baked into images first. The same is true for most shading tricks, such as Blender's Bevel shader, that only exist inside one renderer.
But what about Nanite?
Every time baking comes up, someone mentions Nanite, so let's get it out of the way. Unreal Engine 5's Nanite virtualized geometry is a genuinely big deal. Epic's documentation lists "use high-poly detailing rather than baking detail into normal map textures" as one of its benefits (Epic Games). For many static assets on desktop and console, that is real: you can bring in far denser geometry than before.
But Nanite did not retire baking, it changed which assets need it. From Epic's own docs as of October 2026:
- Platform limits. Nanite needs DirectX 12 with Shader Model 6 on desktop and console. On XR it is experimental and not supported on mobile XR hardware (Epic Games).
- Material and deformation limits. Translucent materials are not supported, and morph-target deformation is not supported (Epic Games).
- Texturing still needs mesh maps. Nanite replaces a normal map that fakes surface shape. It does not replace the curvature, AO, position and ID maps that drive texturing.
- Other engines and the web. Unity, Godot, glTF and three.js pipelines have no Nanite equivalent, so the classic high-to-low bake still applies.
In practice, Nanite has mostly changed what a bake lands on. The mesh that ships can be far denser, sometimes close to the sculpt itself, but it still needs AO, curvature and friends for texturing. Some bake the dense mesh against itself; others keep a medium-poly version, under roughly a million triangles, and bake the full sculpt onto that (Polycount). The results go into UV textures as usual, or into vertex colors, which Nanite meshes support (Epic Games, a Beta feature in Unreal Engine 5.8, shared by every instance of the mesh).
The maps you will bake
Different bakers name them slightly differently, but these are the common ones (Adobe, Marmoset):
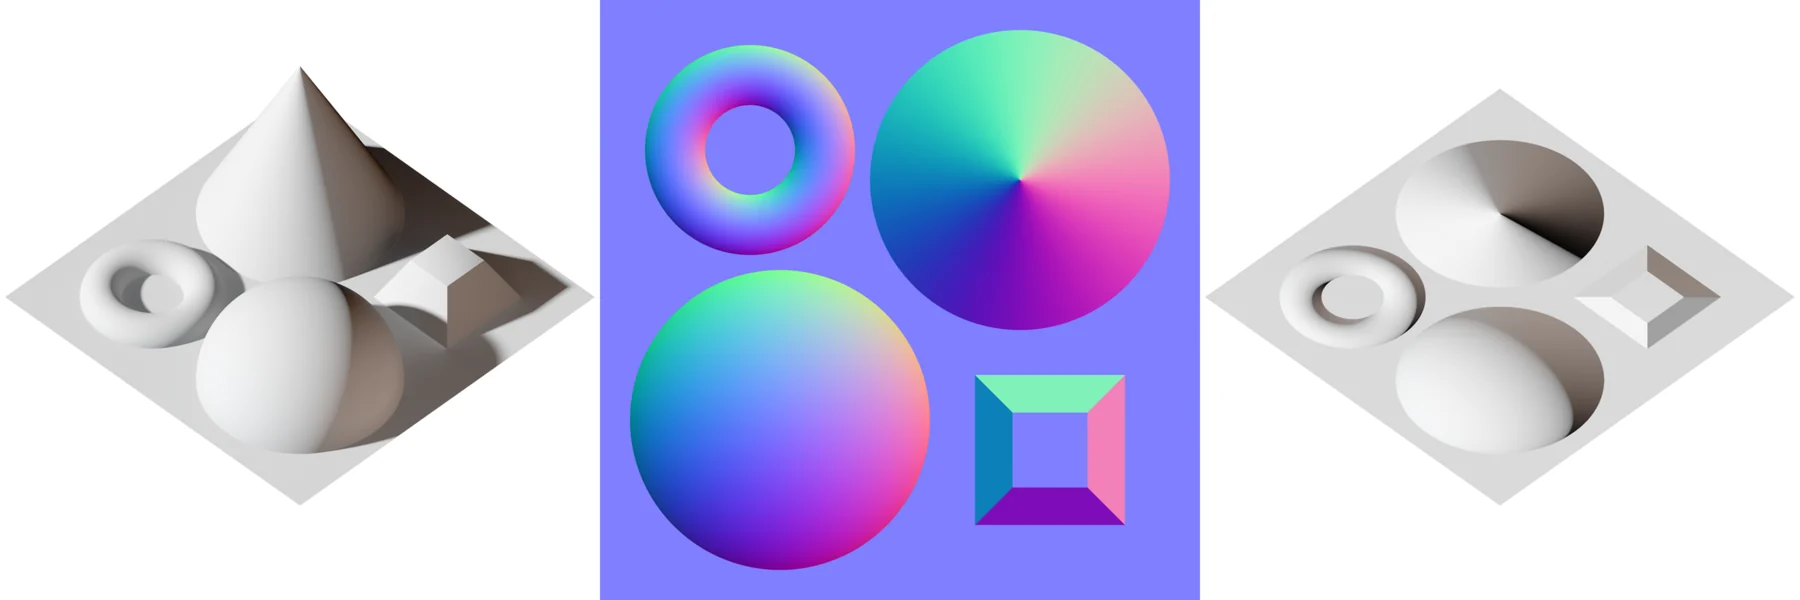
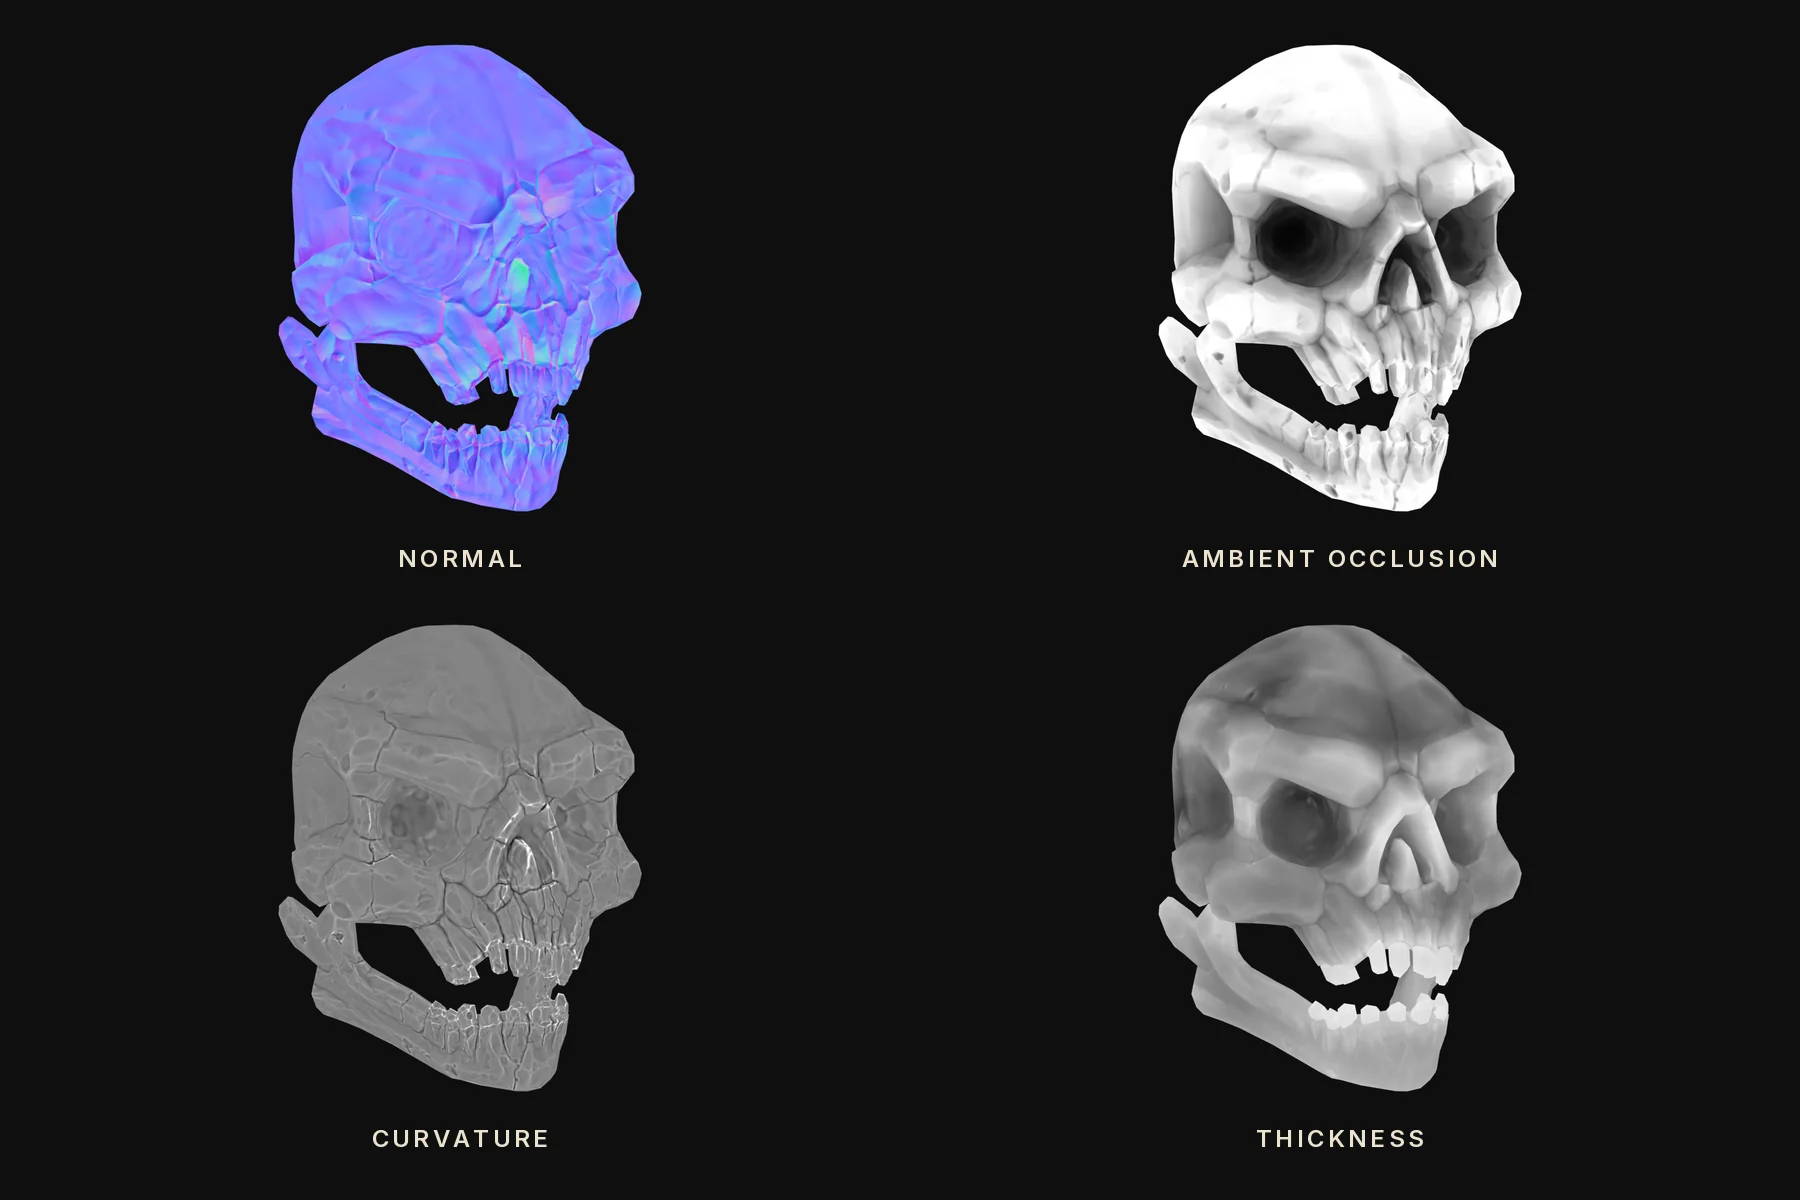
- Normal. Surface direction, usually in tangent space, so a low-poly model shades like the high-poly. The lilac-blue map everyone pictures when you say "baking".
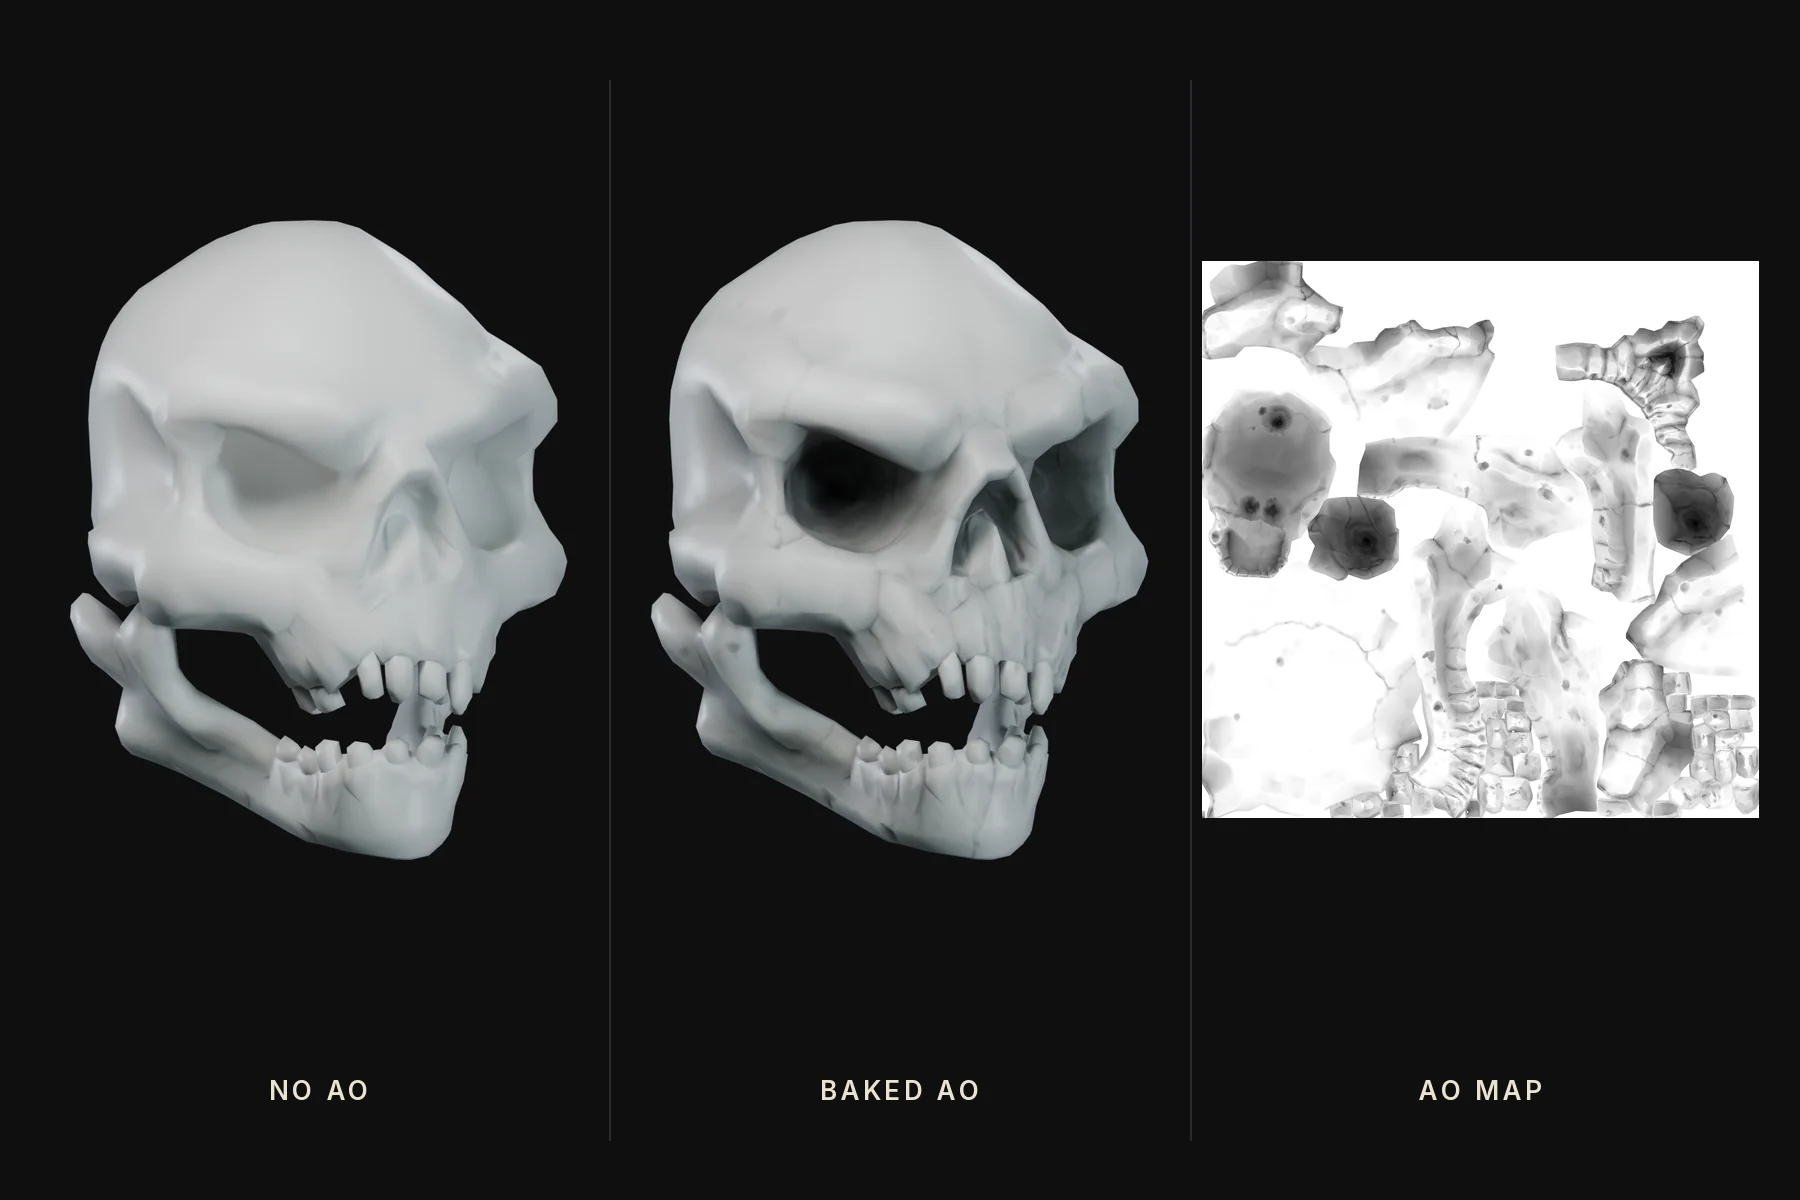
- Ambient occlusion (AO). How much each point is hidden from ambient light. Darkens crevices and contact areas, and drives dirt and grime masks.
- Curvature. Where the surface is convex (edges) or concave (cavities). The usual source for edge wear and cavity masks, and the reason every sci-fi crate has perfectly worn edges.
- Thickness. How thick the object is at each point, measured by casting rays inward. Used for subsurface scattering and masks.
- Position. Where each point sits in 3D space. Useful for top-to-bottom or side-to-side gradients, such as dust on top or rust at the bottom.
- World-space normal. Which way each point faces in the world, for effects such as snow or moss on upward-facing surfaces.
- ID. Flat colors per material, object or polypaint region, used to make quick selection masks while texturing.
- Height. Signed distance between the low and high surface, for parallax or displacement.
- Bent normal. The average unoccluded direction around each point, used in some lighting and occlusion setups.
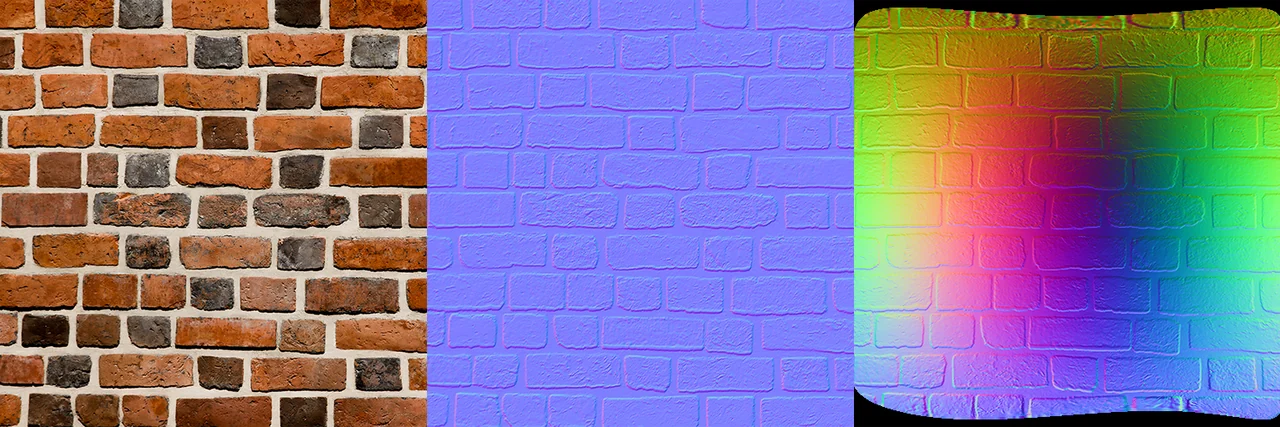
Two of these deserve a closer look. Normal maps come in more than one space. Tangent-space maps store each direction relative to the surface itself, which is why they look mostly blue and survive the mesh bending or moving. Object-space and world-space maps store directions relative to the whole object or the world, which makes them rainbow-colored and means they break when the mesh deforms (and, for world space, when it rotates).
Ambient occlusion is the easiest map to see working. Multiply it into the color and the model instantly gets depth, with nothing else changed:
How high-to-low projection works
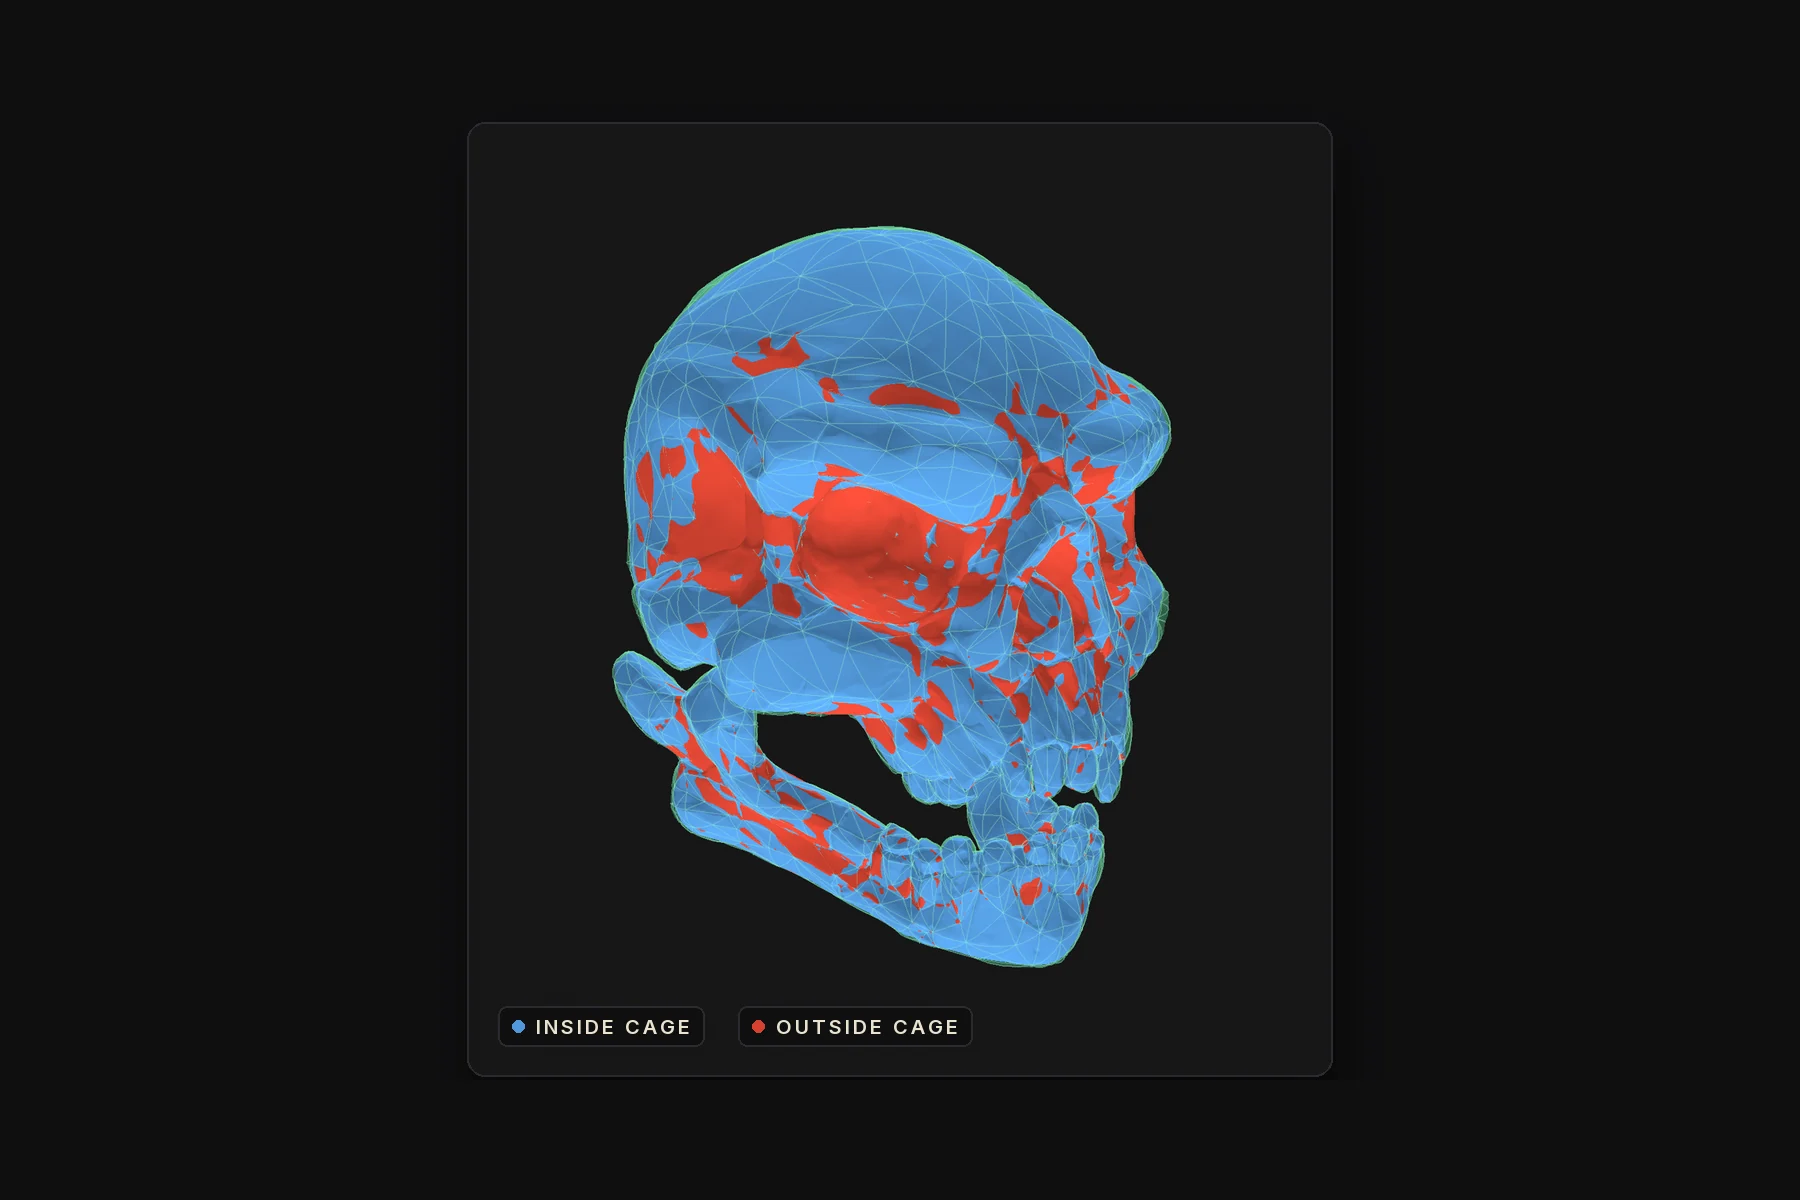
A high-to-low bake works by casting rays. For each texel of the low-poly's UV layout, the baker finds the matching point on the low-poly surface, starts a ray slightly outside it, and travels inward until it hits the high-poly. Whatever it finds there (surface direction, distance, occlusion) is written into that texel (Polycount, Blender manual).
Two settings control where those rays start and how far they travel:
- Ray distance or extrusion. How far out from the low-poly the rays begin, and how far they may travel. Too short and parts of the high-poly are missed; too long and rays hit the wrong surface.
- The cage. An inflated copy of the low-poly that encloses the high-poly, like the low-poly holding its breath. Rays start on the cage and travel inward. A cage gives control per vertex instead of one global distance, and Marmoset recommends it extend just past the highest points of the high-poly (Marmoset).
What usually goes wrong
This is the part you are probably here for. Almost every bad bake comes down to one of these:
- Bleeding between parts. Rays travel too far and hit a neighboring piece, so its detail appears in the wrong place (Adobe). The fixes are a tighter cage, separate bake groups, matching parts by name (wheel_low with wheel_high), or the old-school way: exploding the mesh, moving the parts apart before baking (Adobe, Polycount).
- Skewing. Details bake slanted because the ray direction is off-axis. Marmoset and Fyr Baker let you paint where rays should straighten out (Marmoset).
- Seams at hard edges. Hard edges need matching splits in the UV layout, or the normal map shows seams (Marmoset).
- Too little padding. Without enough margin around UV islands, seams appear, especially at lower mip levels (Polycount).
- Triangulation mismatch. If the baker and the engine split quads into triangles differently, shading breaks. Triangulate before baking (Adobe).
- Tangent space out of sync. A normal map only looks right if the renderer uses the same tangent basis as the baker. Bake in MikkTSpace for Blender, Unity and Unreal (Marmoset, Polycount).
OpenGL or DirectX?
Tangent-space normal maps come in two flavors that differ only in the direction of the green channel: OpenGL (Y+) and DirectX (Y-) (Adobe). Unity and Godot expect OpenGL (Unity, Godot), as do Blender and Maya. Adobe's recommended project settings use DirectX for Unreal Engine and 3ds Max (Adobe). If your dents look like bumps, the green channel is the wrong way round. Everyone gets this wrong at least once, most of us more than once. Flipping it fixes inverted bumps, but it does not fix a tangent-basis or triangulation mismatch.
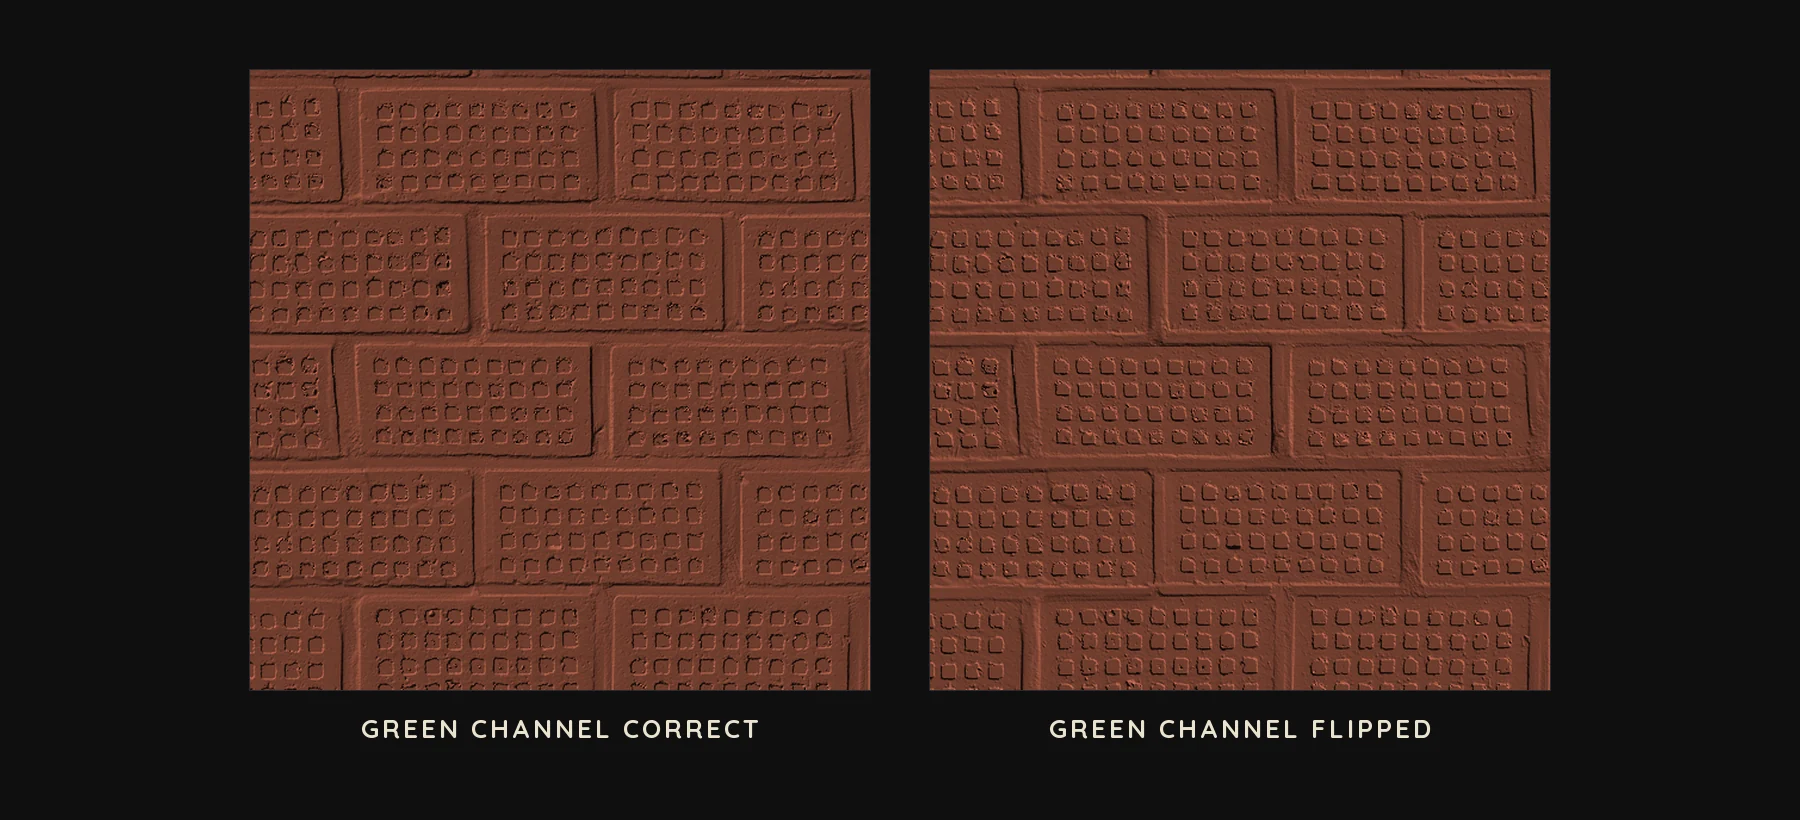
One thing that trips people up: the normal-map convention is not the same as a program's coordinate system. Unity's world is left-handed (Freya Holmér), yet it reads OpenGL-style normal maps. If you want a memorable overview of which software uses which axis as up and which handedness, tech artist Freya Holmér drew the whole thing as hand gestures in Freya's Guide to XYZ Axes and Handedness. It is the kind of thing you end up making finger guns at your monitor to check, and that is completely normal.
Material baking and PBR texture sets
Material baking turns a shader into a standard PBR texture set: base color, roughness, metallic and normal, plus extras such as emission or opacity. To save texture fetches, engines often pack grayscale maps into the channels of one image:
- glTF (ORM): occlusion in red, roughness in green, metallic in blue (Blender manual).
- Unity HDRP mask map: metallic in red, occlusion in green, detail mask in blue, smoothness (the inverse of roughness) in alpha (Unity).
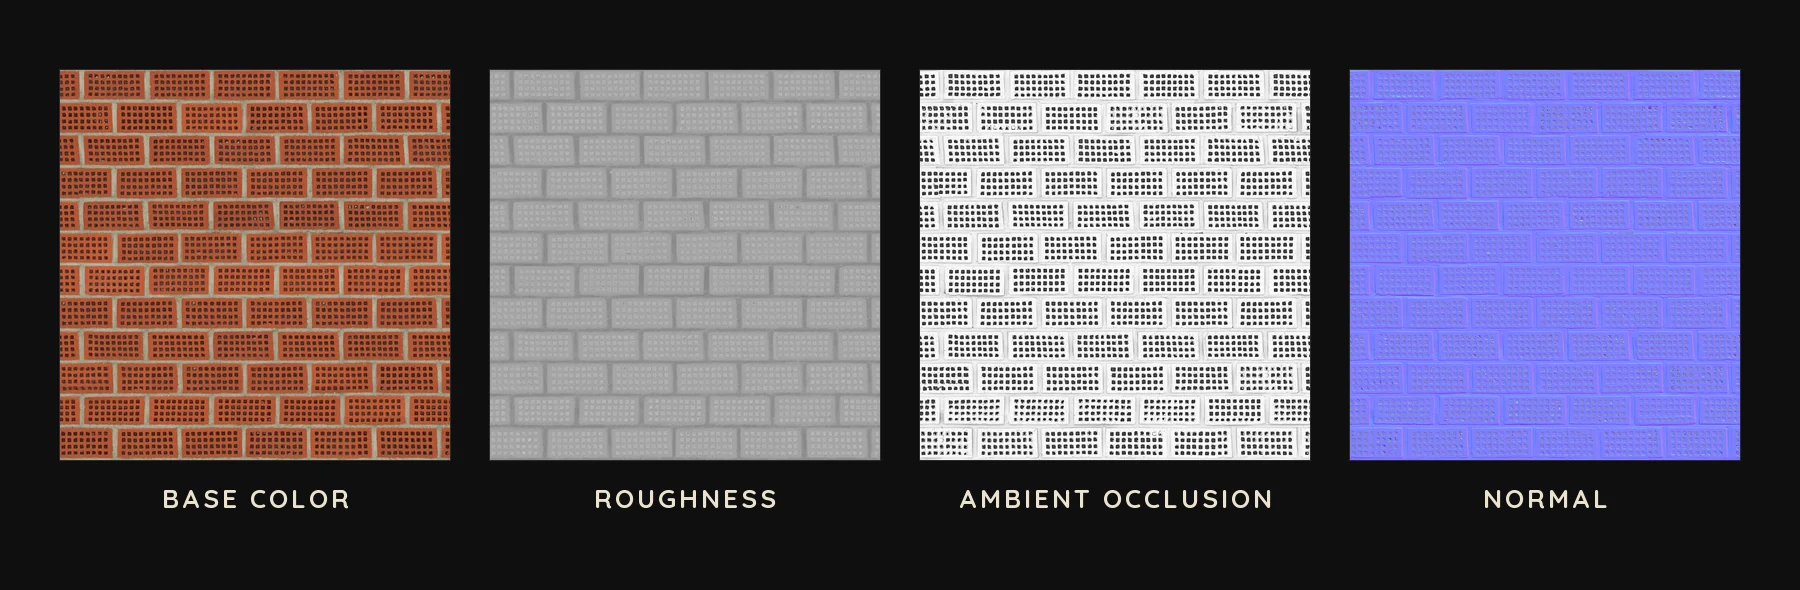
For a hands-on walkthrough, see How to bake procedural materials to PBR textures with Fyr Baker. The same idea applies to shading tricks: baking the Bevel shader into a normal map turns Cycles-only rounded edges into a texture any engine can use.
Baked lighting
Lighting bakes store the result of light, rather than the shape of a surface. Unity defines lightmapping as pre-calculating the brightness of surfaces and storing it for later use; baked data cannot change at runtime, in exchange for performance, which makes it a good fit for static scenes and weaker hardware such as mobile (Unity). Unreal's Lightmass precomputes static and stationary lighting the same way (Unreal).
The tools
Most artists bake in one of these:
- Marmoset Toolbag: baking, texturing and rendering, known for fast interactive baking.
- Adobe Substance 3D Painter: texturing app with built-in bakers that feed its generators and smart materials.
- xNormal: a long-standing free baker for Windows.
- Blender's Cycles baker: built in, with Selected to Active, cages, and image or color-attribute output.
- SimpleBake and Bake Wrangler: Blender add-ons that automate Cycles baking.
- Houdini: bakes between low and high meshes inside procedural pipelines.
- Fyr Baker: my own Blender add-on, with a dedicated GPU bake engine, interactive cages and procedural material baking.
Where to go next
Baking looks like one button, but it is the step where your model, UVs, materials and engine requirements all meet, so it is also where all their problems meet. When a bake goes wrong, the cause is almost always one of the usual suspects above: the cage, the ray distance, the UV layout, the tangent space or the normal format. Check those before you start rebuilding the model at 2am.
If you work in Blender, I have written hands-on tutorials for the trickiest parts: fixing bake artifacts with cages, baking procedural materials to PBR textures, and baking the Bevel shader into a normal map.
Sources
- Polycount wiki: Texture Baking and Normal Map Technical Details
- Marmoset: Toolbag Baking Tutorial
- Blender manual: Render Baking and glTF 2.0
- Adobe Substance 3D documentation
- Blinn 1978, Krishnamurthy and Levoy 1996, Cohen, Olano and Manocha 1998, Cignoni et al. 1998
- Mikkelsen: thesis and papers, MikkTSpace
- Epic Games: Nanite, Nanite and Lumen for XR, Paint Vertex Colors, Global Illumination
- Polycount: best practices for Nanite assets
- Unity: Normal maps, Lightmapping, HDRP Mask Map
- Freya Holmér: Guide to XYZ Axes and Handedness
- Valve: Dota 2 workshop requirements (Earthshaker)
- Michael Abrash: Quake's lighting model
Image credits
- "Normal map example with scene and result" by Julian Herzog, CC BY 4.0, resized.
- "Bump map vs isosurface" by GDallimore, public domain, resized.
- Bricks088 by Lennart Demes, ambientCG, CC0, combined with labels.
- "Vertex tangent, bitangent and normal vector" by A2569875, based on work by McSush and TN, public domain.
- "NormalMaps" by Peter23, CC BY-SA 3.0, resized.
- Green channel comparison: made by Fyr Plugins from Bricks088 by Lennart Demes, ambientCG, CC0.
- All other images: Fyr Plugins, made with Blender and Fyr Baker.